


Proxy Integration with ScrapeBox
Elevate your web scraping and SEO game with Smartproxy’s residential proxies and the ScrapeBox tool.
14-day money-back option

55M+ IP pool
Advanced targeting
195+ global locations
24/7 tech support
Easy to integrate
99.99% uptime

What is ScrapeBox?
ScrapeBox is a go-to tool for public data collection and SEO. It allows you to gather and extract web data, automate tasks like harvesting URLs, conduct competitor research, build links, and so much more.

Quick multi-threaded operation
Experience lightning-fast performance with the ability to handle multiple simultaneous connections seamlessly.

Simple customization
Access various options and enjoy customization to suit your unique needs – all at a pocket-friendly price.

Numerous features add-ons
Unlock hundreds of features and over 30 free complimentary add-ons to enhance the tool and your SEO strategy.
Why residential proxies?

A residential proxy is an intermediary that allows users to get a real IP address from an authentic household device connected to a local network.
Smartproxy offers residential proxies with 55M+ HTTP(S) and SOCKS5 IPs in 195+ locations. Enjoy <0.5s response time, 99.68% success rate, 99.99% uptime, and unlimited threads and concurrent sessions. Feelin’ unsure? Test our residential proxies with a 3-day free trial or go for a flexible Pay As You Go payment option.
Set up Smartproxy proxies with ScrapeBox
First, let’s begin by visiting the official website of ScrapeBox to download the app. Once we have it downloaded, we can proceed to get things going.
Integration with residential proxies
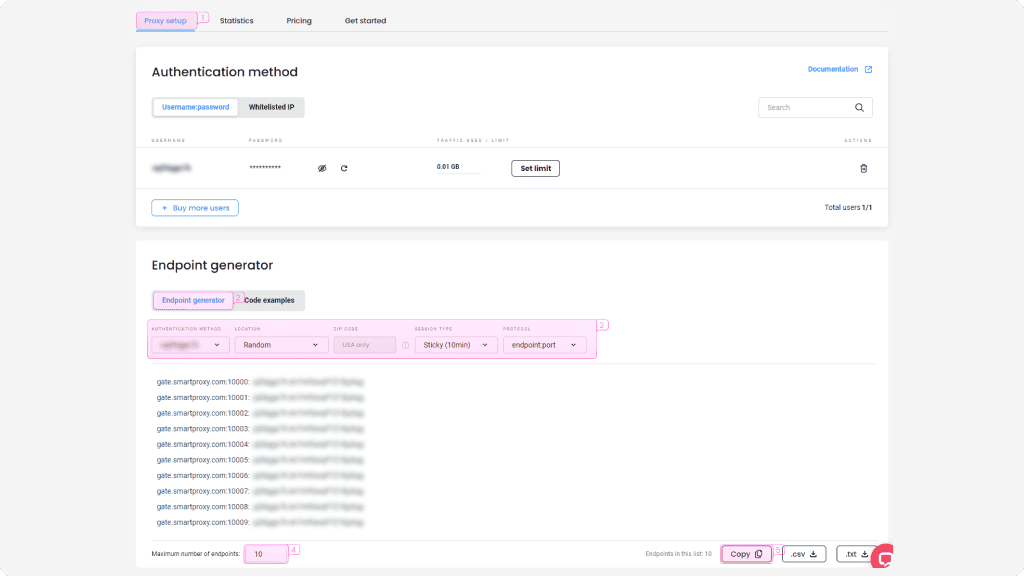
Log in to your Smartproxy dashboard, find residential proxies by choosing Residential under the Residential Proxies column on the left panel, and select a plan that suits your needs. Then, follow these steps:
- Open the Proxy setup tab.
- Navigate to the Endpoint generator below.
- Configure the parameters. Set your authentication method, location, session type, and protocol.
- Select the number of proxy endpoints you want to generate (default – 10).
- Copy the endpoints by clicking the Copy button.
Setting up proxies with Scrapebox
After you’ve got your endpoints, you can pair residential proxies with ScrapeBox.
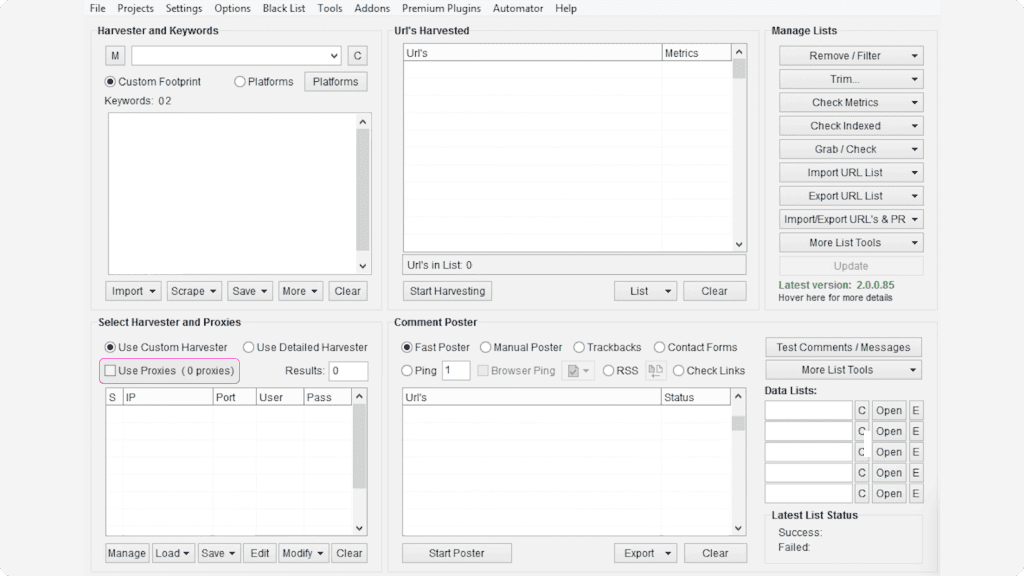
1. Open ScrapeBox.
2. Check the Use Proxies checkbox in Select Harvester and Proxies settings.

3. Click the Edit button found in the same settings menu to start setting up your proxies.
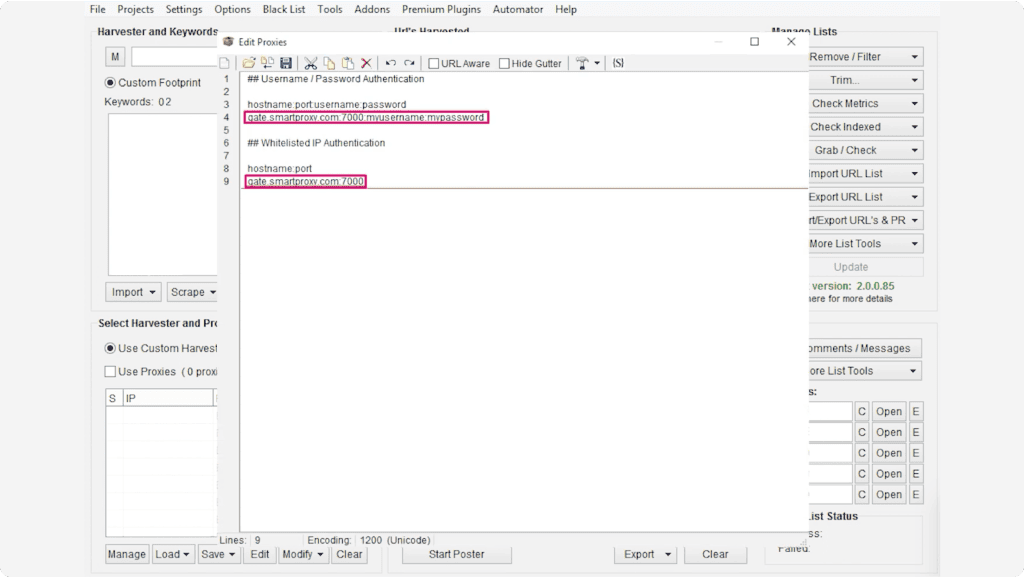
4. Depending on the authentication method you would like to use, type in the information of your chosen proxy authentication methodauthentication method as in the example below:
5. Save the proxy settings and you should see them appear in the Select Harvester and Proxies settings.
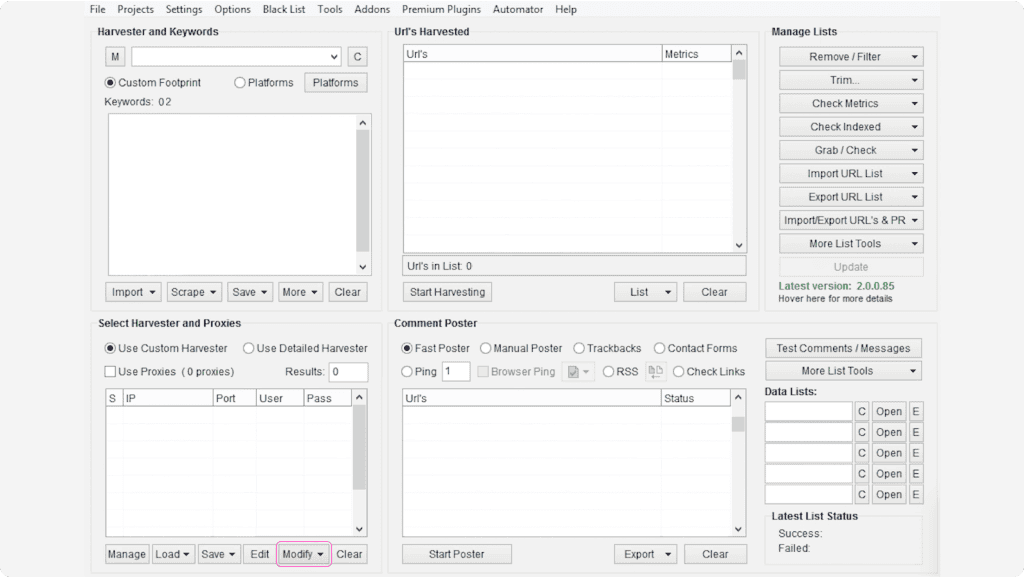
6. Select all the proxies you’ve entered and click the Modify button.
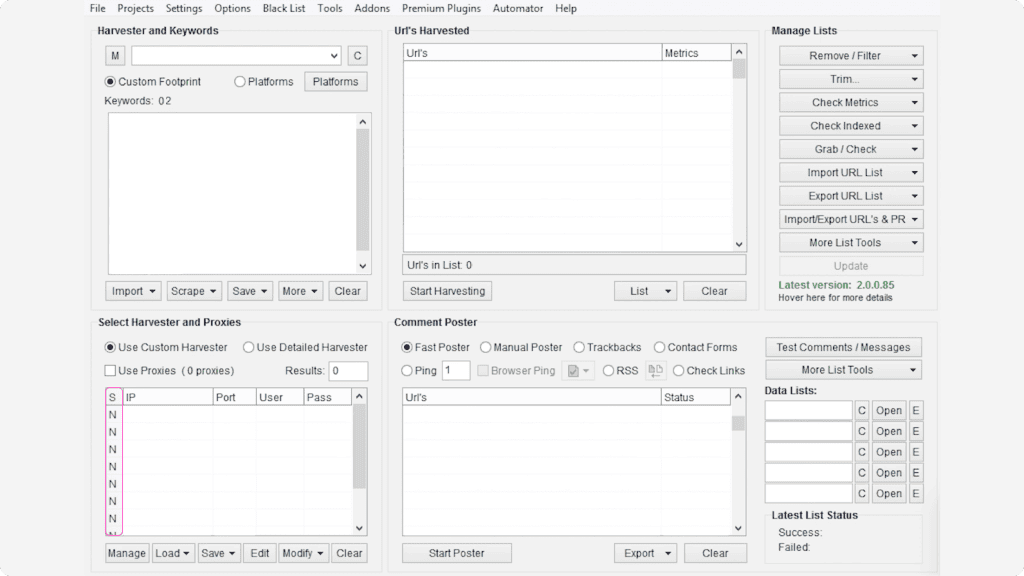
7. Select the option Mark all Proxies as Non-Socks proxies. If done correctly, you should see the letter “N” under each entered proxy in the “S” field in the proxy table.
8. Configure the rest of your ScrapeBox settings and run a test. To do this, check if the Harvester Status shows “Proxies Enabled”.
NOTE: Make sure you’re not checking the proxy status in the Proxy Editor itself, as you'll get a negative result. This happens because ScrapeBox doesn't support checks on backconnect proxies used by Smartproxy.
Configurations & Integrations
Easy Smartproxy proxy setup with popular applications and third-party tools. Check out these guides to get started right away.


Reliable proxies at affordable prices
Pick a plan that suits you. Get ahead with unblockable and stable proxies.
8 GB
$5.5
$2.75/ GB
Total:$44$22 + VAT billed monthly
Use discount code - RESI50
25 GB
$5.2
$2.6/ GB
Total:$130$65 + VAT billed monthly
Use discount code - RESI50
50 GB
$4.9
$2.45/ GB
Total:$245$123 + VAT billed monthly
Use discount code - RESI50
100 GB
$4.5
$2.25/ GB
Total:$450$225 + VAT billed monthly
Use discount code - RESI50
With each plan you access
55M+ ethically-sourced IPs
HTTPS & SOCKS5 support
<0.5s average response time
99.68% success rate
Unlimited threads & concurrent sessions
Country, state, city ASN & ZIP code targeting
Rotating and sticky sessions
#1 IP quality in the market
Free 24/7 tech support
SSL Secure Payment
Your information is protected by 256-bit SSL
Google Pay and Apple Pay are only available with Smart Wallet*
What people are saying about us
We're thrilled to have the support of our 50K+ clients and the industry's best


Featured in:


Explore our other proxy line products
What are proxies?
A proxy is an intermediary between your device and the internet, forwarding requests between your device and the internet while masking your IP address.

Residential Proxies
from $2.2/GB
Real, physical device IPs that provide a genuine online identity and enhance your anonymity online. Learn more

ISP Proxies
from $0.35/IP
IPs assigned by Internet Service Providers (ISPs), offering efficient and location-specific online access with minimal latency. Learn more

Mobile Proxies
from $4.5/GB
Mobile device based IPs offering anonymity and real user behavior for mobile-related activities on the internet. Learn more

Datacenter Proxies
from $0.09/IP
Remote computers with unique IPs for tasks requiring scalability, fast response times, and reliable connections. Learn more

Site Unblocker
from $1.6/1K req
A powerful application for all proxying activities offering dynamic rendering, browser fingerprinting, and much more. Learn more
Smartproxy Blog
Build knowledge on residential proxies, or pick up some dope ideas for your next project - our blog is just the perfect place.
Most recent

How to Scrape Amazon Prices Using Excel
If you’re here, you already know Amazon constantly tweaks product prices. The eCommerce giant makes around 2.5 million price changes daily, resulting in the average item seeing new pricing roughly every ten minutes. For sellers, marketers, and savvy shoppers, that creates both a challenge and an opportunity.
This comprehensive guide walks you through proven methods – from Excel's built-in tools to powerful scraping APIs that can simplify your Amazon price monitoring workflow.

Zilvinas Tamulis
Mar 31, 2025
8 min read
Most popular

How to Scrape GitHub: A Practical Tutorial 2025
GitHub is one of the most significant sources of technical knowledge on the internet, especially for developers building intricate applications. Follow this guide to learn how to extract this valuable data and effortlessly follow the latest tech trends.
Zilvinas Tamulis
Mar 29, 2024
10 min read

How to Send a POST Request With cURL?
Sending a POST request with cURL is a common task in web development and API interactions. When making a POST request, cURL allows you to send data to a server, often to submit forms or interact with APIs. Understanding how to craft and send POST requests using cURL is essential for testing APIs, debugging, and automating web interactions. In this guide, we'll explore how to use cURL to send POST requests effectively.
Martin Ganchev
Aug 21, 2024
8 min read

How to Scrape Google Maps: A Step-By-Step Tutorial 2025
Google Maps scraping is the process of using automated tools or scripts to extract information like business names, locations, and reviews from Google Maps. In this blog post, we’ll discuss the benefits of scraping Google Maps with a step-by-step guide on how to do it using Python, and introduce Smartproxy's ready-made scraper for those who prefer not to code.
Dominykas Niaura
Mar 29, 2024
10 min read

Ad Verification Best Practices: A Comprehensive Guide
According to Markets and Markets research, the AdTech market is projected to grow from $579.4B (2023) to $1496.2B by 2030, with an annual growth rate of 14.5%. As the ad verification landscape accelerates, so does the need to collect publicly available real-time data.
In this guide, we’ll explore the essential strategies and techniques required to maintain ad integrity, combat fraud, and maximize campaign performance in this ever-changing industry. Our marketing experts gathered all the best practices
Vilius Sakutis
Mar 25, 2024
6 min read
Frequently asked questions
What is Scrapebox?
ScrapeBox is a software that automates the process of gathering data from websites.
What is Scrapebox used for?
The ScrapeBox tool is designed for use cases such as web scraping and SEO.
Be aware that any tools mentioned in this article belong to a third party, not Smartproxy. Therefore, Smartproxy will not be responsible for any of the services offered by the third-party. Make sure to thoroughly review the third-party’s policies and practices, or do your due diligence, before using or accessing any of their services.
The Fastest Residential Proxies
Dive into a 55M+ ethically-sourced residential IP pool from 195+ locations worldwide.
14-day money-back option