How to Scrape Google Maps: A Step-By-Step Tutorial 2025
Google Maps scraping is the process of using automated tools or scripts to extract information like business names, locations, and reviews from Google Maps. In this blog post, we’ll discuss the benefits of scraping Google Maps with a step-by-step guide on how to do it using Python, and introduce Smartproxy's ready-made scraper for those who prefer not to code.
The benefit of scraping Google Maps
Let’s start with the "why." Google Maps is already rich and only gets richer every day with invaluable data that’s continually updated. There are restaurants, cafes, bars, supermarkets, hotels, pharmacies, auto repair shops, gyms, historical landmarks, theaters, parks… you name it. Google Maps covers virtually every category of interest.
The data extracted from Google Maps can be a pivotal resource for businesses and analysts alike. It’s used for many applications, such as market research, price aggregation, brand monitoring, competitor analysis, and more. Furthermore, this wealth of information can support customer engagement strategies, location planning, and service optimization, which is helpful for competitive positioning in various industries.
How to scrape Google Maps with Python and proxies
One way to retrieve Google Maps data is via the official API, but this method has several downsides. Its limitations include data access restrictions, query limits, and potential costs associated with high-volume usage. Therefore, we suggest exploring an alternative scraping technique for more customizability.
In this guide, we’ll use the Selenium web automation tool together with the Selenium Wire library for extended functionalities, including proxy support, Webdriver Manager to automatically manage the browser drivers, and Beautiful Soup for parsing HTML data. Our example target will be Google Maps results for establishments in London that serve the great Middle Eastern dish – falafel.
Preparing your coding environment
Make sure you have a coding setup that allows you to write and run scripts. This could be through a platform like Jupyter Notebook, an Integrated Development Environment (IDE) such as Visual Studio Code, or a basic text editor paired with a command-line tool.
You’ll need to have installed Python on your system and use the following command on Command Prompt (Windows) or Terminal (macOS, Linux) to install all the necessary libraries for the script we’ll be using to scrape Google Maps (use pip3 if you’re on macOS):
pip install selenium selenium-wire webdriver-manager beautifulsoup4
Now create a new Python script file and import these libraries.
from seleniumwire import webdriverfrom selenium.webdriver.chrome.service import Servicefrom webdriver_manager.chrome import ChromeDriverManagerfrom selenium.webdriver.common.by import Byfrom selenium.webdriver.common.action_chains import ActionChainsfrom selenium.webdriver.common.keys import Keysfrom bs4 import BeautifulSoupimport timeimport csv
Getting residential proxies
Using proxies in a scraping project is essential for smooth and continuous data collection. Proxies mask your scraping activity by routing requests through various IP addresses, helping to maintain anonymity and avoid IP detection and bans from target websites like Google Maps.
Furthermore, proxies enable users to scale their efforts without hitting rate limits and access content across different regions. For this tutorial, we’ll show you how to integrate our residential proxies, but you can use datacenter, mobile, or ISP proxies, depending on your case.
- If you don’t have a Smartproxy account, create one on our dashboard.
- Find residential proxies by choosing Residential under the Residential Proxies column on the left panel, and purchase the plan that best suits your needs.
- Go to the Proxy setup tab and proceed to the Endpoint generator section below to configure the parameters.
- Choose the authentication method, location, session type, and protocol, and get your credentials and proxy endpoint.
Integrating proxies
On the Smartproxy dashboard, you can select the Code examples tab to find integration help for cURL, Python, Node.js, PHP, and Go languages. However, for scraping Google Maps, we’ll use a specific Python library called Selenium Wire to integrate proxies in our script, so the code will have to be written a little differently. It’s an extension to Selenium that offers additional features, including the ability to configure and use proxies with authentication easily.
Here’s the proxy integration structure where you’ll have to insert your username and password in the appropriate fields instead of username and password:
proxy_username = 'username'proxy_password = 'password'seleniumwire_options = {'proxy': {'http': f'http://{proxy_username}:{proxy_password}@gate.smartproxy.com:10000','verify_ssl': False,},}
You might want to use a different hostname and port for specific geo-targeting purposes. For example, since we’re interested in gathering data on falafel places in London, we’ll select London as the location and Rotating as the session type (optional). In such a case, we’d adjust one of the lines of our code to this:
'http': f'http://{proxy_username}:{proxy_password}@city.smartproxy.com:21250',
Finally, let’s add two lines that set up the Selenium Wire driver and proxy configurations to launch with the given options in the script:
service = Service(ChromeDriverManager().install())driver = webdriver.Chrome(service=service, seleniumwire_options=seleniumwire_options)
The service object sets up the ChromeDriver needed for browser automation with Selenium. Then, the driver instantiation with seleniumwire_options applies the proxy settings of your web automation session, enabling the requests to go through our proxies.
Preparing the web browser automation and interaction
When scraping Google Maps, web browser automation and interaction code is essential to your script due to the dynamic nature of the website. Google Maps extensively uses JavaScript to load content, so certain information appears dynamically based on user actions rather than being embedded in the initial HTML. Tools like Selenium mimic user behavior, enabling scripts to trigger the display of data by interacting with the page.
To begin with, let’s specify the URL we’re instructing the browser to visit. Since we’re scraping Google Maps, we should use its URL structure with the keywords "falafel in London" typed in the search bar. This is followed by the command for the driver to open the web page.
url = "https://www.google.com/maps/search/falafel+in+london/"driver.get(url)
Next, we must avoid the prompt that Google can sometimes present before landing on the Google Maps website, which asks us to accept cookies. We’ll use a try-except Python structure because there’s a possibility that our browser instance won’t be asked to accept cookies.
By inspecting the HTML of the page that prompts us to accept cookies, we find the Accept all button’s XPath and class, which we can target to click. The script will indicate in the terminal whether it had to click this button, but this function is optional.
try:button = driver.find_element(By.XPATH,"//button[@class='VfPpkd-LgbsSe VfPpkd-LgbsSe-OWXEXe-k8QpJ VfPpkd-LgbsSe-OWXEXe-dgl2Hf nCP5yc AjY5Oe DuMIQc LQeN7 XWZjwc']")button.click()print("Clicked consent to cookies.")except:print("No consent required.")
Now that we’ve reached our target website with the data we wish to scrape, it’s a good idea first to make the script wait for the map and places to load (for a maximum of 30 seconds). Then, we can take a screenshot of the browser window to give us some visual information on how the page looked when it was scraped. Information like this can help identify page loading errors and what should be adjusted. Change the destination where the screenshot will be saved to your liking.
driver.implicitly_wait(30)screenshot_path = '/path/to/your/destination/screenshot.png'driver.save_screenshot(screenshot_path)print(f"Screenshot saved to {screenshot_path}")
Then, let’s implement browser scrolling so that it loads more places and we can gather more data. This part of the code uses the XPath to locate the Google Maps panel on the left, which contains the data of our interest, selects it to keep it in focus, and scrolls down using the Page Down keyboard button to load more results. In the last line, you can modify the number of presses and pause time between each press according to your needs.
def scroll_panel_with_page_down(driver, panel_xpath, presses, pause_time):"""Scrolls within a specific panel by simulating Page Down key presses.:param driver: The Selenium WebDriver instance.:param panel_xpath: The XPath to the panel element.:param presses: The number of times to press the Page Down key.:param pause_time: Time to pause between key presses, in seconds."""# Find the panel elementpanel_element = driver.find_element(By.XPATH, panel_xpath)# Ensure the panel is in focus by clicking on it# Note: Some elements may not need or allow clicking to focus. Adjust as needed.actions = ActionChains(driver)actions.move_to_element(panel_element).click().perform()# Send the Page Down key to the panel elementfor _ in range(presses):actions = ActionChains(driver)actions.send_keys(Keys.PAGE_DOWN).perform()time.sleep(pause_time)panel_xpath = "//*[@id='QA0Szd']/div/div/div[1]/div[2]/div"scroll_panel_with_page_down(driver, panel_xpath, presses=5, pause_time=1)
Finally, we conclude our browser automation and interaction part by retrieving the page’s HTML source code as seen by the web driver at that moment.
page_source = driver.page_source
Parsing and saving the data to a CSV file
At this point, the script has collected all the data we’re looking for. The next step is to organize and store the gathered information, which we achieve by parsing and saving it to a CSV file.
We can now initialize BeautifulSoup with the HTML content of a webpage to parse it using the HTML parser. The script searches through the parsed HTML to find and store elements based on their CSS class names, which we’ve specified. Information on Google Maps varies by place type, each with its own layout. For example, eateries generally look very different from bus stations. So, by inspecting the Google Maps page of falafels in London, we find that the titles of places are under the class hfpxzc, ratings – MW4etd, review count – UY7F9, and service information – Ahnjwc.
soup = BeautifulSoup(page_source, "html.parser")titles = soup.find_all(class_="hfpxzc")ratings = soup.find_all(class_='MW4etd')reviews = soup.find_all(class_='UY7F9')services = soup.find_all(class_='Ahnjwc')
Then, we can include a couple of lines that provide immediate feedback about the volume of data successfully extracted. It helps us verify that our script functions as intended by confirming the number of places identified during the scraping process.
elements_count = len(elements)print(f"Number of places found: {elements_count}")
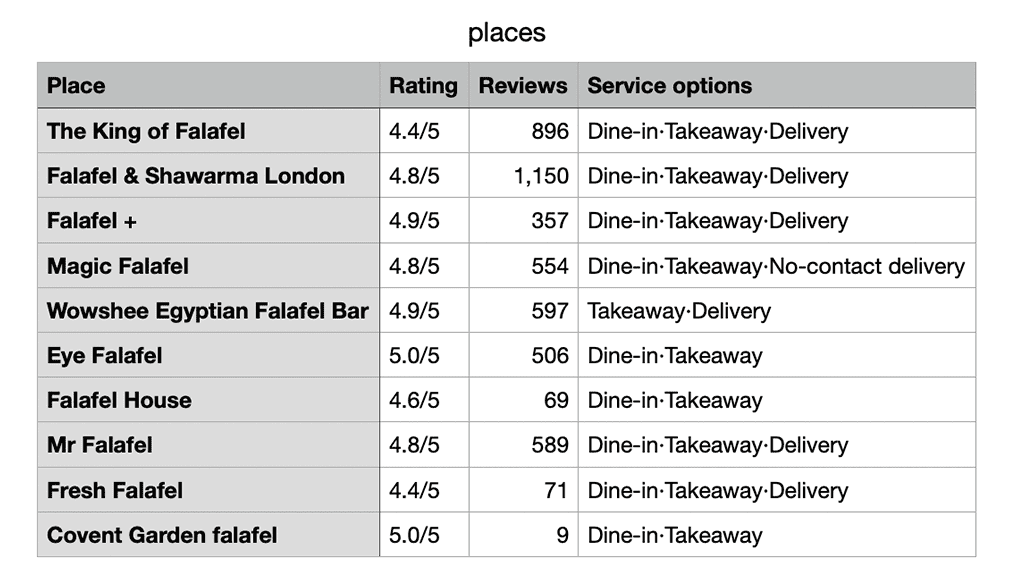
Next, we specify a file path for saving scraped data into a CSV file named places.csv. The script opens this file for writing and creates a header row with the columns 'Place', 'Rating', 'Reviews', and 'Service options'. Following this, it iterates over each title obtained from scraping, gathers corresponding ratings, review counts, and service options, and inserts this data into subsequent rows of the CSV file. Finally, the terminal notifies us that the data has been successfully saved to the specified path.
csv_file_path = '/path/to/your/destination/places.csv'with open(csv_file_path, 'w', newline='', encoding='utf-8') as csv_file:csv_writer = csv.writer(csv_file)csv_writer.writerow(['Place', 'Rating', 'Reviews', 'Service options'])for i, title in enumerate(titles):title = title.get('aria-label')rating = (ratings[i].text + "/5") if i < len(ratings) else 'N/A'review_count = reviews[i].text if i < len(reviews) else 'N/A'service = services[i].text if i < len(services) else 'N/A'if title:csv_writer.writerow([title, rating, review_count, service])print(f"Data has been saved to '{csv_file_path}'")
At the very end of our script, we can close the browser window and end the web driver session, effectively cleaning up and releasing resources used during web automation with Selenium.
driver.quit()

Start your 3-day free trial of residential proxies
Experience the power of 55M+ IPs from 195+ global locations.
The full Google Maps scraping code
Here’s our full script for scraping Google Maps to find falafel places in London.
from seleniumwire import webdriverfrom selenium.webdriver.chrome.service import Servicefrom webdriver_manager.chrome import ChromeDriverManagerfrom bs4 import BeautifulSoupfrom selenium.webdriver.common.by import Byfrom selenium.webdriver.common.action_chains import ActionChainsfrom selenium.webdriver.common.keys import Keysimport timeimport csv# Selenium Wire configuration to use a proxyproxy_username = 'username'proxy_password = 'password'seleniumwire_options = {'proxy': {'http': f'http://{proxy_username}:{proxy_password}@city.smartproxy.com:21250','verify_ssl': False,},}service = Service(ChromeDriverManager().install())driver = webdriver.Chrome(service=service, seleniumwire_options=seleniumwire_options)# URL of the web pageurl = "https://www.google.com/maps/search/falafel+in+london/"# Open the web pagedriver.get(url)try:button = driver.find_element(By.XPATH,"//button[@class='VfPpkd-LgbsSe VfPpkd-LgbsSe-OWXEXe-k8QpJ VfPpkd-LgbsSe-OWXEXe-dgl2Hf nCP5yc AjY5Oe DuMIQc LQeN7 XWZjwc']")button.click()print("Clicked consent to cookies.")except:print("No consent required.")# Set an implicit wait time to wait for JavaScript to renderdriver.implicitly_wait(30) # Wait for max 30 seconds# Take a screenshot after the content you want is loadedscreenshot_path = '/path/to/your/destination/screenshot.png'driver.save_screenshot(screenshot_path)print(f"Screenshot saved to {screenshot_path}")def scroll_panel_with_page_down(driver, panel_xpath, presses, pause_time):"""Scrolls within a specific panel by simulating Page Down key presses.:param driver: The Selenium WebDriver instance.:param panel_xpath: The XPath to the panel element.:param presses: The number of times to press the Page Down key.:param pause_time: Time to pause between key presses, in seconds."""# Find the panel elementpanel_element = driver.find_element(By.XPATH, panel_xpath)# Ensure the panel is in focus by clicking on it# Note: Some elements may not need or allow clicking to focus. Adjust as needed.actions = ActionChains(driver)actions.move_to_element(panel_element).click().perform()# Send the Page Down key to the panel elementfor _ in range(presses):actions = ActionChains(driver)actions.send_keys(Keys.PAGE_DOWN).perform()time.sleep(pause_time)panel_xpath = "//*[@id='QA0Szd']/div/div/div[1]/div[2]/div"scroll_panel_with_page_down(driver, panel_xpath, presses=5, pause_time=1)# Get the page HTML sourcepage_source = driver.page_source# Parse the HTML using BeautifulSoupsoup = BeautifulSoup(page_source, "html.parser")# Find all elements using its classtitles = soup.find_all(class_="hfpxzc")ratings = soup.find_all(class_='MW4etd')reviews = soup.find_all(class_='UY7F9')services = soup.find_all(class_='Ahnjwc')# Print the number of places foundelements_count = len(titles)print(f"Number of places found: {elements_count}")# Specify the CSV file pathcsv_file_path = '/path/to/your/destination/places.csv'# Open a CSV file in write modewith open(csv_file_path, 'w', newline='', encoding='utf-8') as csv_file:# Create a CSV writer objectcsv_writer = csv.writer(csv_file)# Write the header row (optional, adjust according to your data)csv_writer.writerow(['Place', 'Rating', 'Reviews', 'Service options'])# Write the extracted datafor i, title in enumerate(titles):title = title.get('aria-label')rating = (ratings[i].text + "/5") if i < len(ratings) else 'N/A' # Ensure we have a rating and reviews for each title, defaulting to 'N/A' if not foundreview_count = reviews[i].text if i < len(reviews) else 'N/A'service = services[i].text if i < len(services) else 'N/A'# Write a row to the CSV fileif title:csv_writer.writerow([title, rating, review_count, service])print(f"Data has been saved to '{csv_file_path}'")# Close the WebDriverdriver.quit()
After running this script, the terminal will show you if it had to consent to cookies, where it saved a screenshot of the browser window, how many places were extracted, and the location where the CSV file with all the information was saved.
You’ve now scraped Google Maps for falafel in London, but you can quickly appropriate this script for any other target of interest in any other location.
How to use our ready-made Google Maps scraper
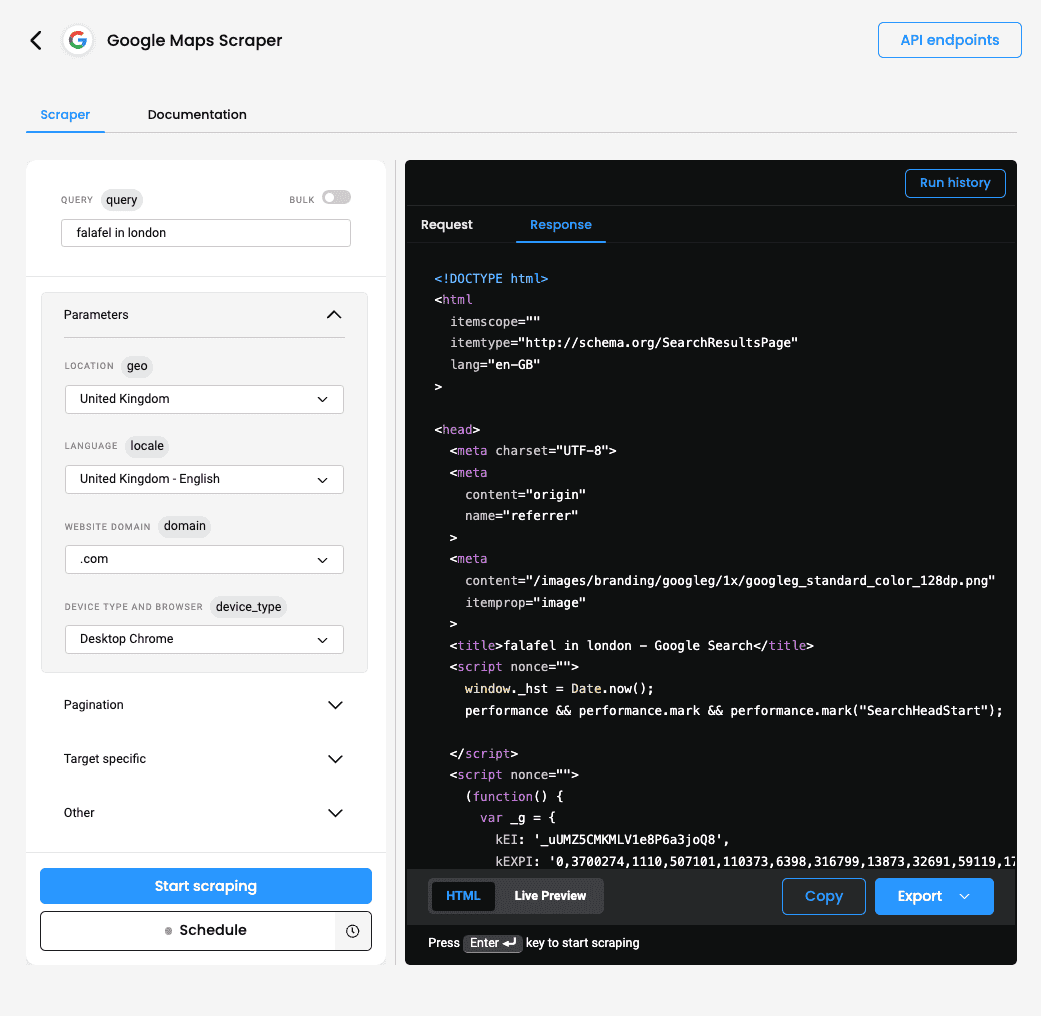
Another option for scraping Google Maps is using our SERP Scraping API's ready-made scraper, designed specifically for this target. It eliminates the need to build custom code; however, the results will be in HTML, so you may need to parse them for better readability. Here's how to get started:
- Go to our dashboard. On the left panel, click Scraping APIs, select Pricing, and choose the SERP target group and a plan that suits your needs or claim a 7-day free trial to test our service.
- In the Scrapers tab, choose Google Maps under Popular Scrapers or after clicking Create new scraper.
- Enter your query and configure parameters such as location, language, website domain, device type, browser, pagination, JavaScript rendering, and more.
- Click Save & Scrape or Schedule your task. The results will appear shortly, and you can copy or export them in HTML format.
Using this ready-made scraper for Google Maps simplifies the data-gathering process, making it a convenient choice for those who prefer a no-code solution.
To sum up
Congrats on learning to scrape Google Maps using Python and our residential proxies! The main thing to remember is to adjust your script based on the specific page you’re targeting and check once in a while whether Google hasn’t updated its page structure, which could potentially disrupt your project. Don’t forget to arm yourself with proxies, and you’ll surely gather that falafel or other data you’re after. Alternatively, you can use our ready-made scraper if you'd prefer to skip the coding part.
About the author

Dominykas Niaura
Technical Copywriter
Dominykas brings a unique blend of philosophical insight and technical expertise to his writing. Starting his career as a film critic and music industry copywriter, he's now an expert in making complex proxy and web scraping concepts accessible to everyone.
Connect with Dominykas via LinkedIn
All information on Smartproxy Blog is provided on an as is basis and for informational purposes only. We make no representation and disclaim all liability with respect to your use of any information contained on Smartproxy Blog or any third-party websites that may belinked therein.


