


Get Started with ISP Proxies
Learn how to set up ISP proxies by following our quick start guide. Gather valuable web data without facing CAPTCHAs or IP blocks.
14-day money-back option

Unlimited duration sessions
99.99% uptime
Country-level targeting
24/7 tech support
In-depth dev documentation


What is an ISP proxy?
ISP proxy is an intermediary server originating from an internet service provider that connects the user and the website. Users value ISP proxies for their combination of residential-like authenticity and rock-solid datacenter proxy stability.
Most popular ISP proxies use cases
Unbeatable uptime and advanced targeting – match made in heaven for every task.

Price aggregation
Gather real-time data from the most popular websites, identify eCommerce industry pricing fluctuations, and master dynamic pricing strategies.

Web scraping
Stay updated by collecting public web data from even the most advanced targets without facing IP bans or CAPTCHAs.

AdTech
Optimize the performance of your ads, ensure proper campaign format, monitor competitors, and prevent ad fraud across various global locations.

Cybersecurity
Strengthen your online security by implementing secure network configurations, optimizing bandwidth, and mitigating DDoS attacks through traffic intermediation.
Learn how to set up Smartproxy ISP proxies
Experience a simple setup process by following our video guide.
How to set up ISP proxies
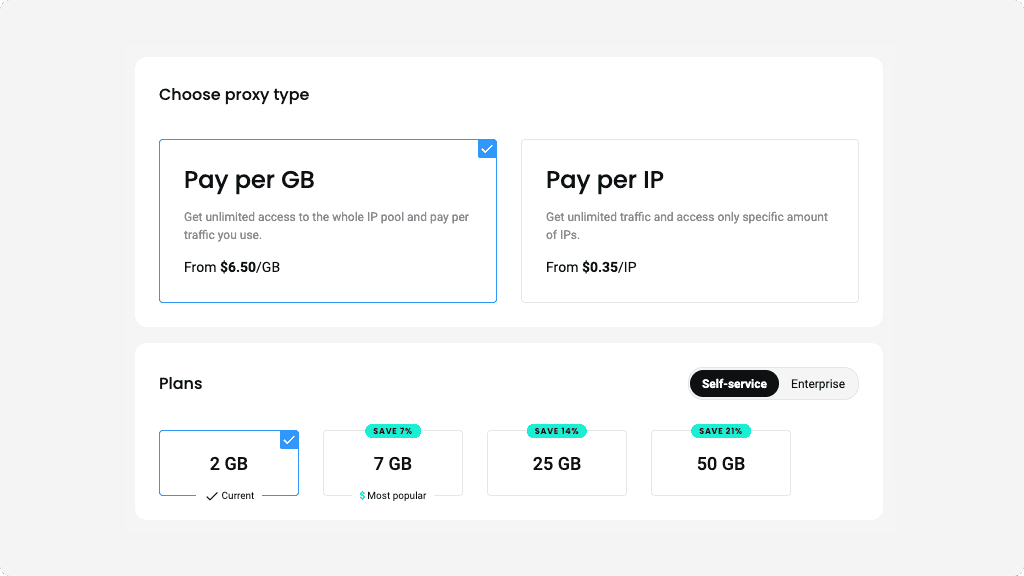
Choose a subscription
After creating your account, choose the subscription option that suits your needs. We offer a range of plans and the ability to upgrade as you go throughout your proxying journey.
Select Pay per GB proxy type to get unlimited access to the whole IP pool and pay for the traffic you use or Pay per IP proxy type to get unlimited traffic and access to a specific number of IPs.
With Pay per IP, you can choose between using a shared pool of IPs or dedicated IPs that will belong only to you.
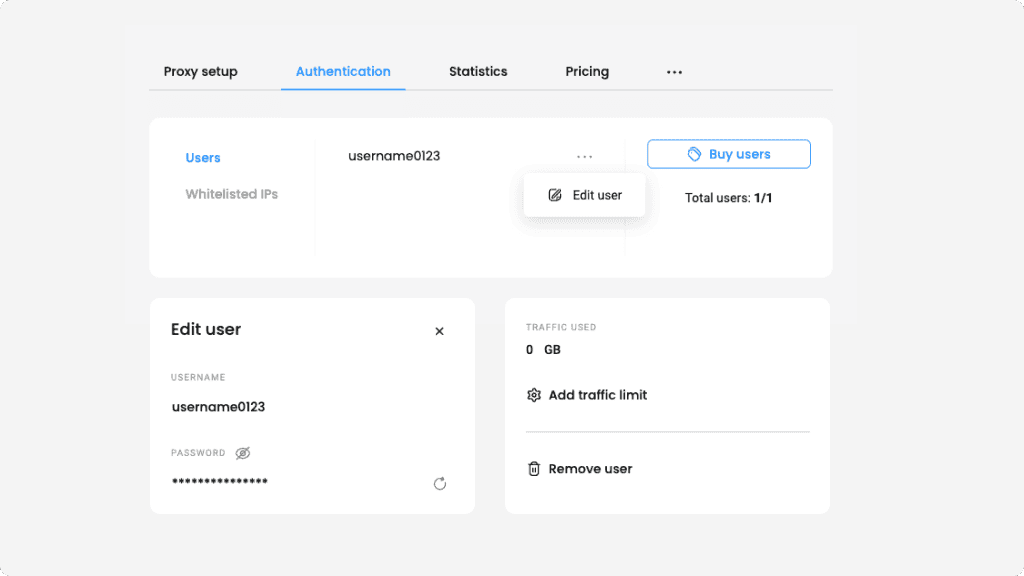
Authenticate with username:password
In the Authentication tab, you’ll see that your first proxy user is created automatically. To delete it, click the three dots next to your username, select Edit user, Remove user, and Confirm.
To create a new user, click Create user. You can enter a custom username, while the password will be generated automatically.
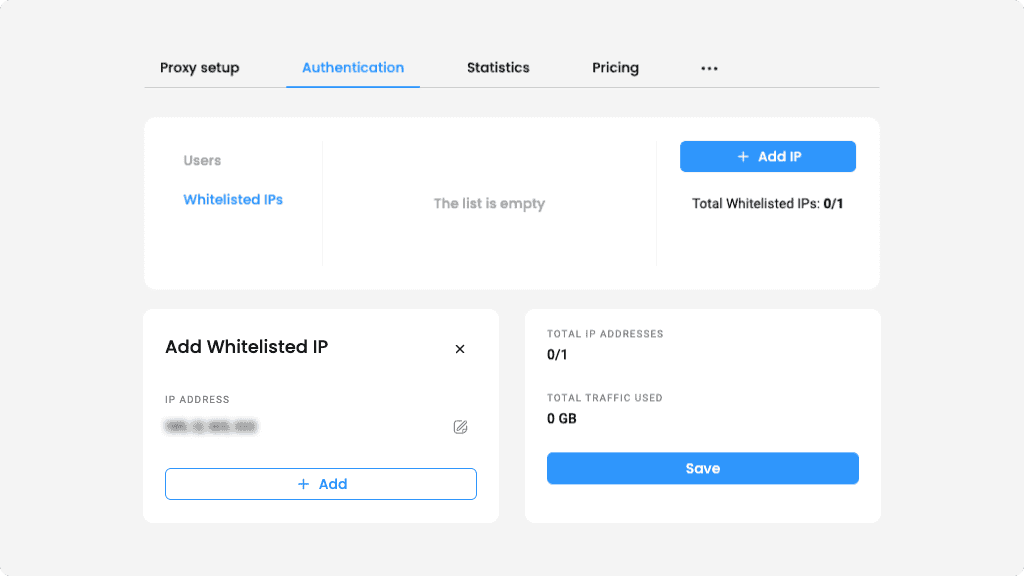
Authenticate by whitelisting IPs
In the Authentication tab, click on Whitelisted IPs. Then, select Add IP, enter an IP manually, and click Save. Alternatively, you can add your current IP by simply pressing + Add.
Please note that we only support IPv4 format IPs. Ensure the IP you're adding is yours, and you’re not using a proxy or VPN service.
To name your whitelisted IP, click on the three dots and Edit IP. Select the edit icon next to Name, type in any name, and save it. To remove an IP, click the trash bin icon and Confirm.
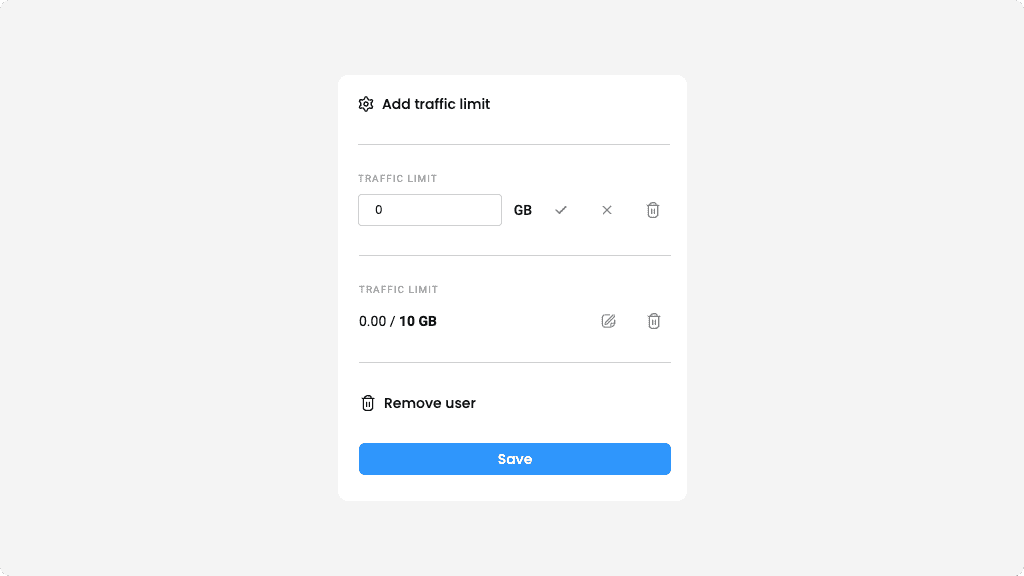
Add a traffic limit
To set a traffic limit for a user, click on the three dots, Edit user, and Add traffic limit. Input an amount of GBs the user won’t be able to exceed, and click Save.
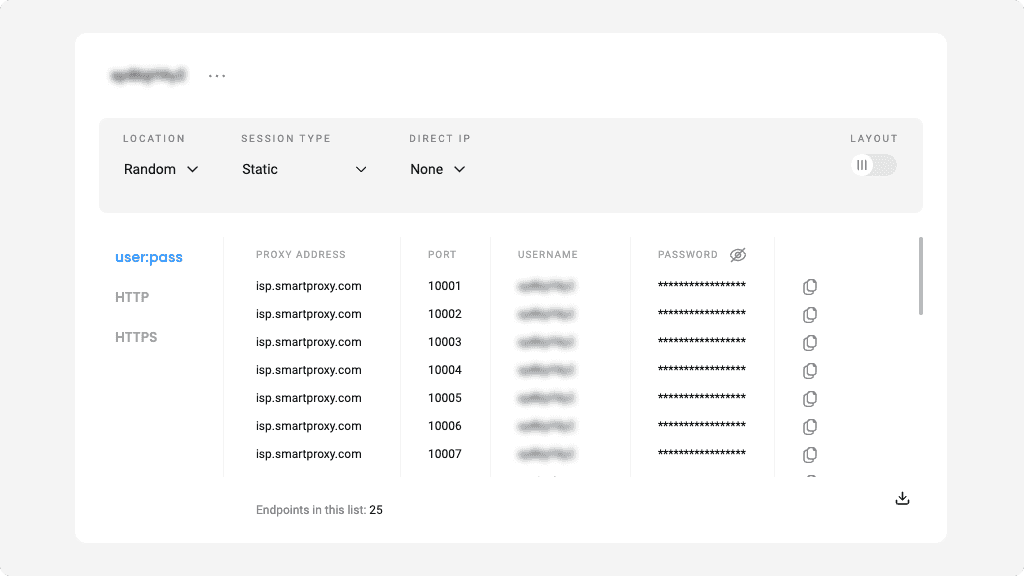
Select parameters
Navigate to the Proxy setup tab. Select a user (if you have more than one), and then you’ll be able to customize your proxy parameters.
Under the location menu, opt for "Random," to select IPs from our pools randomly, or choose a specific country.
Under the session type menu, choose static sessions and keep the same IP or rotating sessions to change IP with each new request.
Next, choose your preferred protocol. Our static residential (ISP) proxies support connections using HTTP, HTTPS, and endpoint:port configuration.
You can enter a number of endpoints you’d like to be generated. The default value is set to 10. Copy a specific part or one entire endpoint to your clipboard, or download the list in CSV or TXT format.
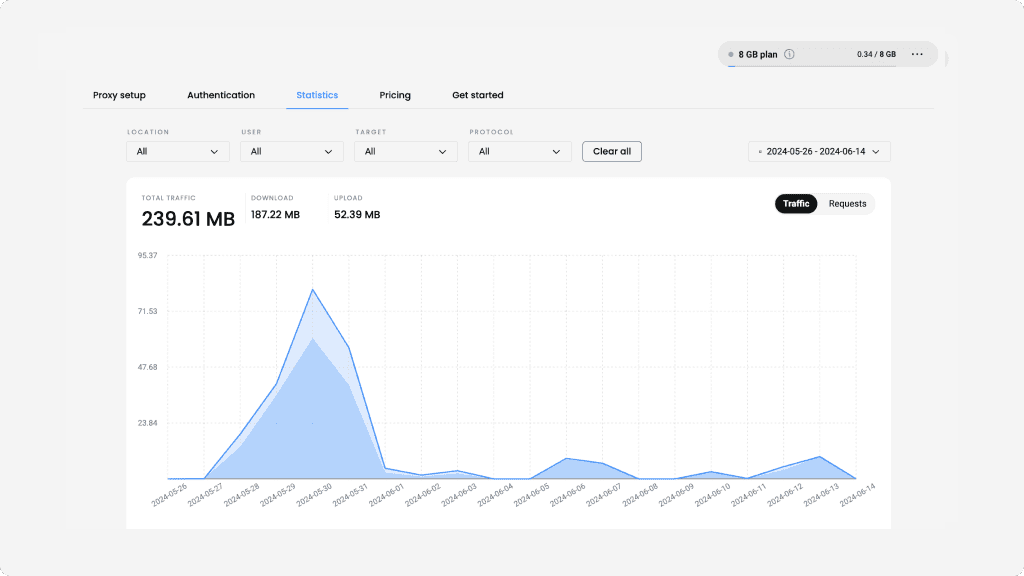
Keep track of your statistics
To monitor your proxy usage, navigate to the Statistics tab. Here, you’ll see the traffic usage for each user over a week, month, or a custom period. You can also view the amount of cumulative uploads, downloads, and requests.
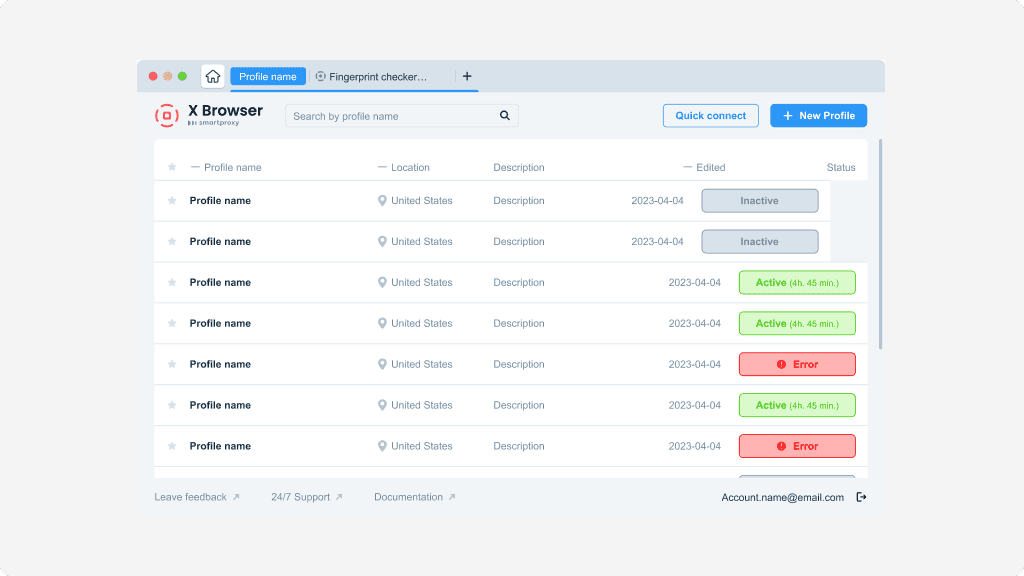
Use static residential (ISP) proxies
Apply the proxy endpoint information and, if required, credentials to any application or tool. You can integrate our static residential (ISP) proxies with a range of third-party tools or our free X Browser to complete your tasks with ease.
Free tools, same great user-friendliness

X Browser
Juggling multiple profiles has never been easier. Get unique fingerprints and use as many browsers as you need, risk-free!
Chrome Browser Extension
Easy-to-use, damn powerful. A proxy wonderland in your browser, accessible in 2 clicks. Free of charge.
Firefox Browser Add-on
Easy to set up, even easier to use. The virtual world at your fingertips in 2 clicks. Free of charge.

Proxy Checker
Verify your IPs with free Proxy Checker. Quickly & efficiently check your IPs to avoid potential errors.
Smartproxy blog
Most recent
What is Data Scraping? Definition and Best Techniques (2025)
The data scraping tools market is growing significantly, valued at approximately $703.56M in 2024. The market is projected to grow more due to the increasing demand for real-time data collection across various industries.

Vytautas Savickas
Mar 28, 2025
6 min read
Most popular

How to Send a cURL GET Request
Tired of gathering data inefficiently? Well, have you tried cURL? It’s a powerful and versatile command-line tool for transferring data with URLs. Its simplicity and wide range of capabilities make it a go-to solution for developers, data analysts, and businesses alike. Simply put, the cURL GET request method is the cornerstone of web scraping and data gathering. It enables you to access publicly available data without the need for complex coding or expensive software. In this blog post, we’ll explain how to send cURL GET requests, so you’re ready to harness its fullest potential.
Dominykas Niaura
Jan 02, 2024
7 min read

How to Bypass CAPTCHA With Puppeteer: A Step-By-Step Guide
Since their inception in 2000, CAPTCHAs have been crucial for website security, distinguishing human users from bots. They are a savior for website owners and a nightmare for data gatherers. While CAPTCHAs enhance website integrity, they pose challenges for those reliant on automated data gathering. In this comprehensive guide, we delve into the fundamentals of Puppeteer, focusing on techniques for CAPTCHA detection and avoidance using Puppeteer. We also explore strategies for how to bypass CAPTCHA verification, methods for solving CAPTCHAs with specialized third-party services, and the alternative solutions provided by our Site Unblocker.
Dominykas Niaura
Dec 04, 2023
10 min read

Staying Ahead of the Curve: Using Proxies and Scraping Solutions to Monitor Pricing, Trends, and Competitors
Businesses rely on real-time data about pricing, market trends, and their rivals' activities to make well-informed decisions and maintain a competitive edge. In fact, 98%¹ of executives agree it’s somewhat or very important to increase data analysis in their companies over the upcoming 1 to 3 years. Manual data collection methods are time-consuming, less efficient, and sometimes even provide outdated data, resulting in missed opportunities and potential loss of market share.
Fortunately, thanks to technological advancements, innovative and easy-to-use solutions like proxies and web scraping tools offer businesses a powerful way to monitor and analyze vital information efficiently.
With this in-depth article, we invite you to explore the proxy and scraping landscape, discover the pros and cons of such solutions, and learn how to identify some of the best real-time data collection options in the market matching the most popular use cases. Grab a cup of coffee and continue reading.
If you can't access the whole article, make sure you have disabled your ad blocker.
Ella Moore
Sep 07, 2023
11 min read

Google Sheets Web Scraping: An Ultimate Guide for 2025
Google Sheets is a powerful tool that hosts various data management and analysis features. While it usually deals with information already gathered elsewhere, few know that Sheets have built-in functions that can also gather website data on their own! This article will explore the many benefits of using Google Sheets for web scraping and how to build a powerful in-house web scraping machine without ever leaving your browser window.
Zilvinas Tamulis
Jan 26, 2024
6 min read
14-day money-back option