


How To Set Up Your Proxies with Dolphin Anty
The anti-detect browser Dolphin Anty and Smartproxy proxy services help you enhance your digital identity protection and effortlessly manage multiple accounts on social media. Find out how you can use the two together to achieve outstanding results!
14-day money-back option

65M+ IPs
195+ locations
Advanced proxy rotation
24/7 tech support
99.99% uptime
Unlimited connections & threads

What is Dolphin Anty?
Dolphin Anty is an anti-detect browser built for managing multiple accounts on social media that allows you to create and use several browser instances simultaneously. It features enhanced privacy options, a built-in proxy manager, the ability to create and manage profiles simultaneously, write statuses and notes, and so much more.
Why proxies?

Dolphin Anty features a very intuitive interface for proxy management that allows you to import, set up, and use various proxies for your connections. This ensures enhanced privacy and lets you avoid detection, as each profile will have a unique browser fingerprint and come from a different location from anywhere in the world.
Residential proxies are an excellent option for this use case, as they are built on real home devices that make your connections appear natural and human-like. Smartproxy offers residential proxies with a massive pool of 55M+ IPs from over 195 locations worldwide, ensuring your browsing activity remains untraceable and anonymous.
Another great option is datacenter proxies. They are low-cost, stable, and fast proxies built on remote computers that are perfect for tasks that require quick response times and reliable connections. With our datacenter proxies, you can be sure to have a 99.99% uptime, <0.3s response times, unlimited connections and threads, and the ability to scale your infrastructure according to your needs.
How to use Dolphin Anty with proxy servers
Set up Smartproxy proxies with the Dolphin Anty browser
To begin using Dolphin Anty, head over to their website. From here, click Sign up in the top right corner, as you’ll need a new account to use the application. Enter your username and password, and for the promo code section, enter SMARTPROXY, which will give you a 20% discount on your first payment for any plan. This one’s on us! Check out their pricing plans to learn more. After you’ve made the account, click Download and install the anti-detect browser.
You’ll be greeted with a login screen when you open the Dolphin Anty application. Enter the details you used previously to sign up, and you’ll arrive at the browser dashboard. From here, you can create multiple browser profiles, set up different proxies, and configure many other settings.
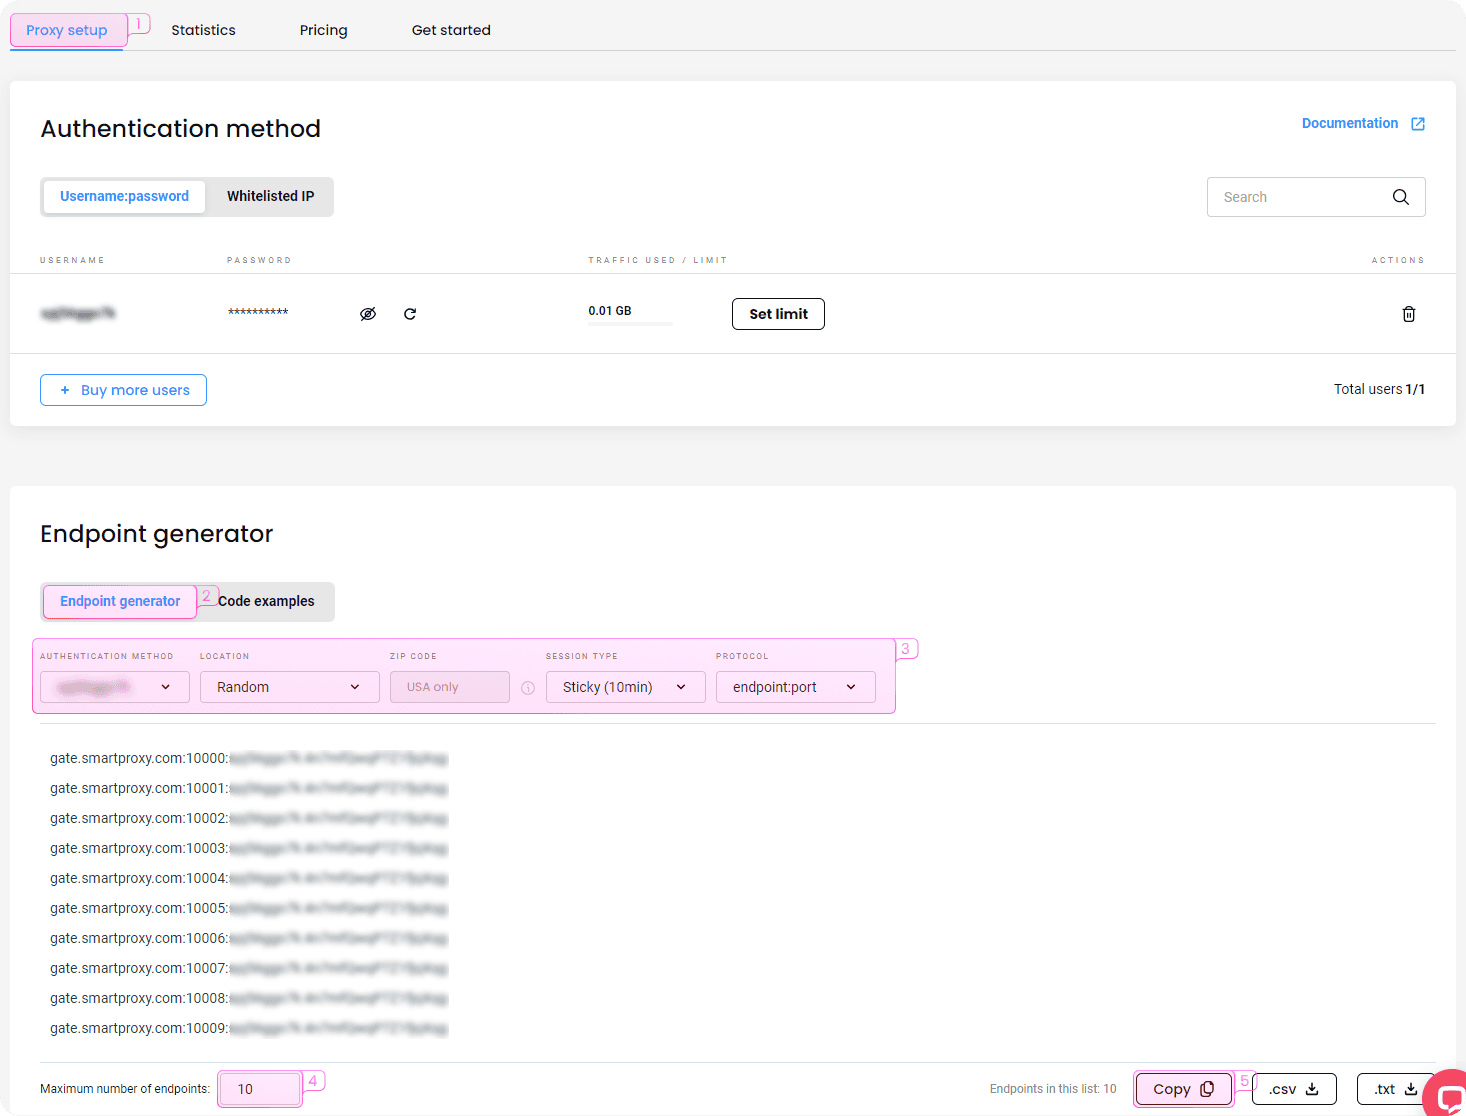
Let’s begin with the proxy setup. You’ll need a list of multiple proxies to import into Dolphin Anty, so let’s grab ‘em. Navigate to the Smartproxy dashboard and select residential or datacenter proxies from the left sidebar based on what you have a plan for.
Use the code SMARTPROXY to get a 20% discount on your first payment for any plan!

Integration with residential proxies
To integrate Dolphin Anty with Smartproxy residential proxies, follow these steps:
- Open the proxy setup tab.
- Navigate to the Endpoint generator.
- Configure the parameters according to your needs. Set your authentication method, location, and session type. Unless you want to use SOCKS5, the protocol choice doesn’t matter, as Dolphin Anty will understand either of the remaining formats.
- Select the number of proxy endpoints you want to generate (default – 10).
- Copy the endpoints.
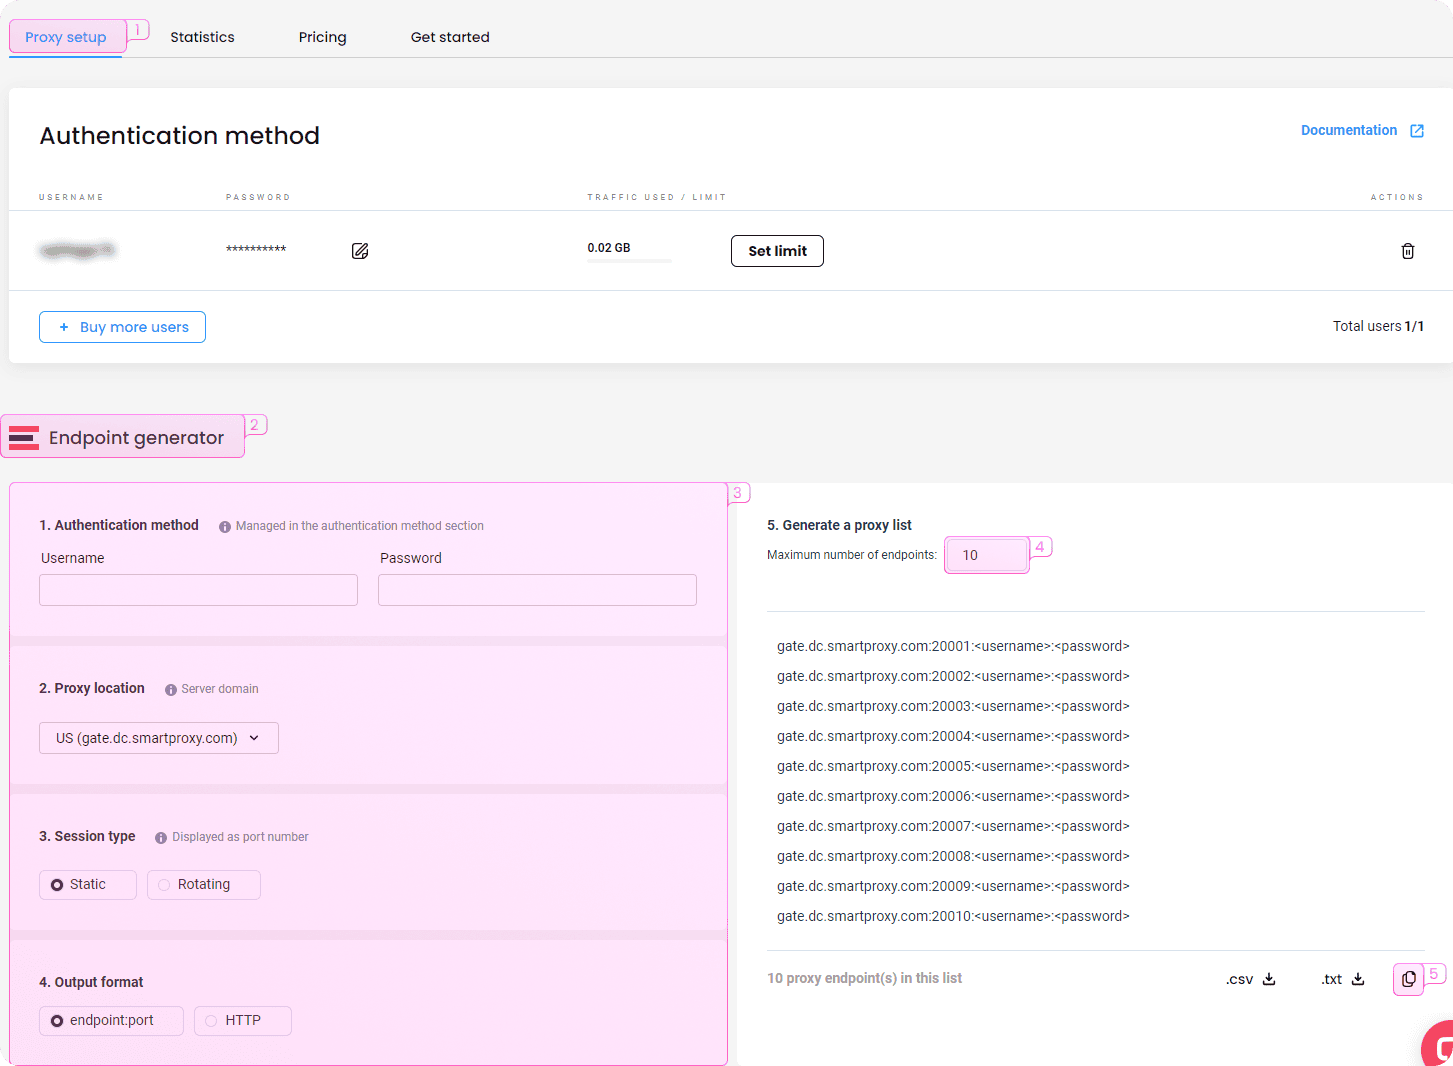
Integration with datacenter proxies
To integrate Dolphin Anty with Smartproxy datacenter proxies, follow these steps:
- Open the proxy setup tab.
- Navigate to the Endpoint generator.
- Configure the parameters according to your needs. Enter your credentials for the authentication method, and set a location and session type. The output format choice doesn’t matter, as Dolphin Anty will understand both formats.
- Select the number of proxy endpoints you want to generate (default – 10).
- Copy the endpoints.
Configuration in Dolphin Anty
Whether you set up your residential or datacenter proxies, from this point on, the steps are the same for both.
- Return to the Dolphin Anty browser and open the Proxies menu. This is the proxy manager interface.
- In the top-right corner, click the + icon to create proxies.
- Paste your proxies from the Smartproxy dashboard. The input allows you to import multiple proxies simultaneously, separated by a new line. You can check the table below to see if the information matches and is correct (for example, if your password is under the correct tab and not located elsewhere).
- Once you’ve confirmed everything is okay, click ADD in the top right to import all your proxy endpoints.
You’ll now see a list of proxies in your Proxies window. It’s always good to check whether they work correctly, so let’s try. You don’t have to open websites and test them one by one as you would with other similar tools. Dolphin Anty offers a quick and easy way to perform a mass check in just a few clicks!
Select all of your proxies by clicking the checkbox icon at the top of the table. Then, in the top-right, click the Check connection button. Dolphin Anty will perform a proxy check for you, and you’ll see the Status update to Active and show a flag, IP, and location information for each endpoint.
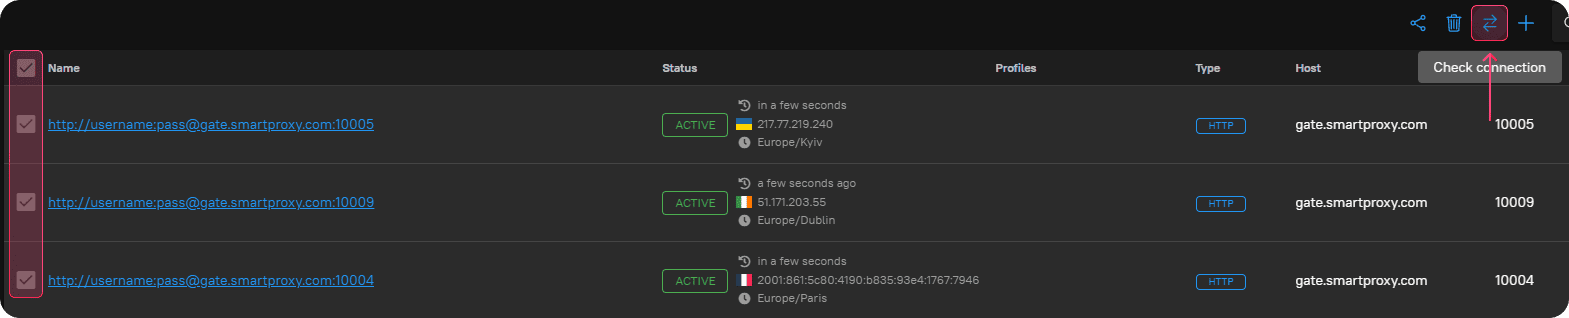
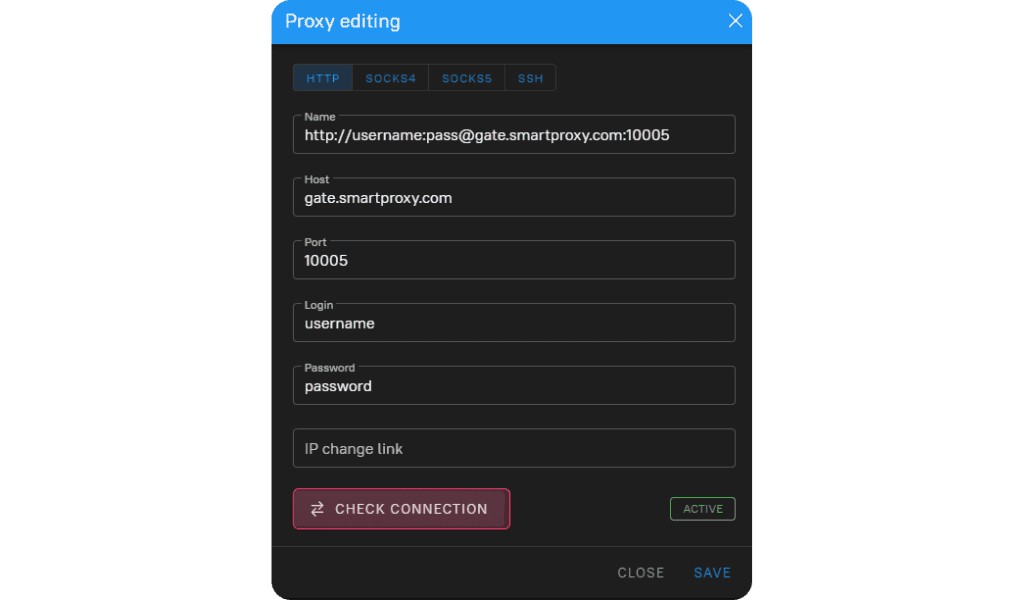
You may also check each endpoint individually – click on its name and then Check connection at the bottom.
The next step in using Smartproxy proxies with Dolphin Anty is profile creation. Each user can create up to 10 profiles for free! Navigate to the Browsers tab and click the + Create profile button at the top. From here, fill in the following details:
- Name. Enter a name for your new profile. It can be anything you like, so go nuts.
- Status. On its own, the status doesn’t change anything about how the profile behaves and is simply used as a reminder for yourself of any issues, bans, or other essential information. You can even create your own custom statuses.
- Tags. Give your profile tags that can later be used to easily identify, sort, and find browser profiles. It’s always a good idea to stay neat and organized before it becomes chaotic (like house cleaning)!
- Platform. Select a platform that the connection should appear to be coming from. This will adjust the user agent header the browser will send to the target website’s server. Information like this can be important to view content for specific operating systems if certain websites have any.
- Social media or crypto. Select one option if you use the browser for any of these purposes. This will customize the profile for that specific usage. For example, by selecting Google, you can enter your credentials to always log in to your Google account as soon as the browser launches.
- Proxy. You can choose not to use a proxy or enter a new proxy connection information. Since you imported many of them previously, click the Saved proxies option. In the dropdown menu, select a proxy to use for this profile.
- Cookies. If you want to use any cookies for this profile, import a list from a file or write them manually.
- User agent. Here, you can see the generated user agent and change it if you’d like. The refresh button on the left will update it if other settings (like the operating system) are changed.
- Various information. The next several options help you further customize how you appear on the web. These can vary based on your specific use case, so it’s best to leave them at default values unless you know exactly what you need.
- Notes. Leave a fully customizable note for yourself. Write anything about the profile, reminders, or a shopping list for after work.
Click + Create to finish creating your browser profile. It will immediately appear in the Dolphin Anty Browsers list and be ready for use. Start the profile, and you’re ready to browse the web through a proxy.
That’s it for the basics. However, you can still learn more about Dolphin Anty to maximize its full potential. Here are some of its most advanced techniques and what you can do with this powerful anti-detect browser:
- Run multiple profiles. Dolphin Anty allows you to create and run several different profiles simultaneously. The free plan allows up to 10 multiple browser profiles, and the paid plans offer even more. You can easily juggle between different browser windows, each with its unique fingerprint and changing proxies, making it impossible to tell they’re coming from one device and avoid detection. For those without multiple 35” monitors who can’t open many windows at once, or just those who like convenience, the Browsers tab offers a very clean and concise view of all of your browser profiles, information on how long they’ve been running, and the ability to start and stop them with a single click of a button.
- Create custom statuses. Is the list of the default statuses you can give your browser profiles insufficient? Head to the Dolphin Anty’s Settings tab and create as many as you like. Unique ways like these can help improve your efficiency, as you’ll be able to see everything you need to know with just a glance of an eye.
- Profile sharing with your team. Open the Users tab and add users to browse together with you. The best thing about it is that you’ll each share the same profiles, bookmarks, and extensions, so new users will not be confused about why something isn’t working or missing. One for all and all for one, as they say.
- Change settings. Is your profile not working as intended, or did you miss something important during the configuration? No worries, as Dolphin Anty allows you to change settings for each profile even while it’s running. Cookie management is also a piece of cake, as you can import and export cookies simply by clicking the three dots next to your profile’s name.
- Bookmarks. Run multiple browser instances and preserve the same quick bookmarks across all. Need easy links to social media websites on all of your browser profiles? Navigate to the Dolphin Anty’s Bookmarks tab and set up a list of bookmarks you want to appear in each browser window.
- Extensions. Did you think that having multiple bookmarks across different browser profiles was cool? Oh boy, wait until you hear that you can do the same with browser extensions! Click the Extensions tab and import them simply by providing a Chrome Web Store URL. All your favorite tools and features will appear every time you launch a new profile, avoiding the hassle of manually setting them up.
- API automation. Doing all of the hard work yourself in this day and age? Nonsense. Dolphin Anty works with popular tools such as Puppeteer, Playwright, and Selenium and offers an extensive API that allows you to write scripts and have them do the job for you. Browse websites, collect data, and post on social media through the Dolphin Anty browser without having to do any of the clicking yourself.
Choose the best proxy plan
2 GB
$6
$3.0/ GB
Total:$12$6 + VAT billed monthly
Use discount code - RESI50
SSL Secure Payment
Your information is protected by 256-bit SSL
Google Pay and Apple Pay are only available with Smart Wallet*
What people are saying about us
We're thrilled to have the support of our 50K+ clients and the industry's best


Recognized by:


Frequently asked questions
What is Dolphin Anty?
Dolphin Anty is an excellent browser for several account management that allows you to run multiple browser instances simultaneously without detection. These can be configured to be completely separate, run through proxy services, have unique browser fingerprints, and be customized to your desire.
The tool also offers many other features, such as collaborating with your team, proxy manager, setting up shared extensions and bookmarks, creating custom statuses, and a user-friendly interface to make it all a straightforward experience.
What is the Dolphin Anty browser used for?
Like many antidetect browsers, Dolphin Anty is used for private browsing, web scraping, bypassing geo-restrictions, social media management, and many other use cases. With the ability to set up unique browser fingerprints, configure proxies, import cookies, and create custom headers, Dolphin Anty is a powerful tool that can find many applications for many projects.
What is a residential proxy?
A residential proxy is an intermediary server between you and the website you're trying to access. This server has an IP address provided by an Internet Service Provider (ISP), not a data center. Each residential IP is a real mobile or desktop device pinning a specific physical location.
Be aware that any tools mentioned in this article belong to a third party, not Smartproxy. Therefore, Smartproxy will not be responsible for any of the services offered by the third-party. Make sure to thoroughly review the third-party’s policies and practices, or do your due diligence, before using or accessing any of their services.